20 June 2010

Back to ABCs

Yep, we're going back again to the unfinished Somawathie series. If anyone has forgotten it already *how could you!* or is new to my blog, do check it out in here.

....

Today I will be taking you to a lil school that we came across on our way to Somawathiya, which lies between Polonnaruwa and Sungawila. The school's name and location will remain a mystery to you, as I felt it's best that way, but the story it tells is something worth sharing so I plan to treat you to a photo spree today!

Um.. why we dropped here en route is a bit embarrassing reason, cause it wasn't for sightseeing. We had a hard time finding a proper washroom after we passed Polonnaruwa as it was a Poya day, a public holiday in Lanka, so most shops and restaurants were closed. We found a lil hut selling hoppers by the roadside and opposite this we found the lil school, almost camouflaged from the narrow road.

It was the holiday season and so some folks were repairing a building.. of all things it had to be the washroom they were repairing! Instead of turning back and leaving, our folks went ahead and inquired and were directed pronto to the caretaker's house sitting next to the school. His wife kindly showed us the way to another washroom, small and a lil run down but quite unexpectedly clean for a rural one.

So on our way back to the cab I didn't forget to take a bunch of snaps. What I found here was something truly intriguing, a lil shocking but as much inspiring.
...

It's a rural school that's struggling for survival, quite small in size with classes from grade 1 to grade 10. Its total count of students = 24. How would I know? Cause my daring lil cousin sis entered the main building and counted it herself. This was later confirmed when I found their cleaning roster with all the 24 names!

Yep, this one long building housed their entire school. All classrooms from grade 1 to 10 were here. Another small building, perpendicular to this, housed their preschool.. I think.. as it had cartoon like murals on its exterior.

...

Let's take a tour around this lil school and see how much they love to learn. They don't need sophisticated facilities and computers to keep up with their counterparts studying at big schools. Even the nearest city of this area has a big Central School five times the size of this.. around 1 km or so away.

But this lil school would remain with open arms, to welcome the not so affluent neighborhood kids who yearns for knowledge.. the most.


See the hanging signs? And the bristol boards? With these they don't need expensive private tuition to study their syllabus.


One classroom = one teacher + 3 students. Some had few more desks than this.


One glance to your left, one glance to your right. You can see the entire school like this.


The teachers and students might be quite close to each other, almost like getting individual teaching. But we heard there were less teachers here, as the newly transferred teachers would re-transfer to bigger schools.


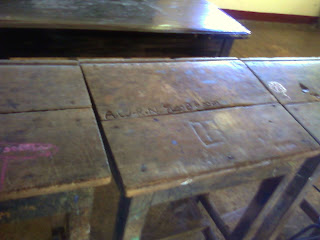
Well, this type of graffiti is something I don't appreciate though. I was taught at my primary school to take a good care of our desks and chairs.. that is one good lesson I've never forgotten. One obsolete desk or chair = one great tree falling down. If you can take better care of school property for many years, think how many trees you can save?


A poster up on a pillar. There were many around the school. Each of them talk about important things students ought to remember.. for life.


Blotted scripts, probably due to rain as they don't have shielded class rooms. The parapets make the classes open from both sides, so rain water can creep in easily, just as much as fresh air from all the greenery.


Things most parents would be embarrassed to teach to their kids but are just as important, considering how rotten the society has become today, aren't left out here.


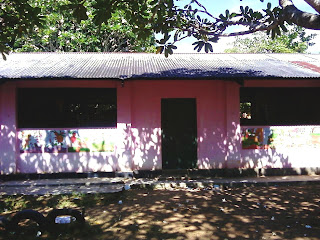
This is the second building, which I thought might be their preschool. Saw a bunch of tires embedded into the ground, vertically. Probably the kids use them to sit on and chat during their lunch breaks.


Took a sneak peek. More posters, charts and notices! Seems like they thoroughly follow the 5S concepts even in these rural village schools.


At the distance you can see their slide made of cement, and hidden behind the araliya (frangipani) are a couple of swings.


Teacher's table and an empty classroom?


Back at the main building I found something interesting. Can you guess from what you can see in this pic?


Even though it was hiding in a shadowed patch at a corner of a classroom, my radar picked up its presence. A visitor who refused to go on vacation. It was a huuuuuuge toad, probably spanning five inches or more with big fat limbs. This isn't a clear capture as I took it from a distance, so had to tweak it to show its silhouette at least.


Dimiyo or the red ants (the big ones). Found them up on a tree going to and fro from their nest. This was a pic I took while holding the cam *my cam phone of course* high up so the dimi folks you see here are actually walking upside down!


I mentioned on my very first post, about seeing a rain water collector that was unique to the dry zone. We saw it on our way to Tantirimale on 1st of August 2009 but I couldn't snap a single one of them. Some months later on 28th of April 2010 I saw the same collector on our way to Somawathiya. And that was at this school!

The school had its own rain water collector built right next to the main building. This one was at least ten feet or more tall and just as wide. It collects and stores water through that chimney. A tube or tap is fixed to a small opening closer to the ground where the folks here can collect water from time to time for consumption.

This massive dome shaped thing is entirely made of concrete and cement so it's really robust and is quite useful during the drought seasons.
...

With this your school tour has come to an end. Thank you for joining. See you next time with another exciting tour. ^__^

14 June 2010

Magical Moments - THE Sequel

Didn't have much time so this is going to be a quick post before I get back to the half finished Somawathie series.. after a few days time.. hopefully. ^__^

....

Exactly 17 days after the first Magical Moments was witnessed there was this staging of its sequel! O__O I know this can't be, within the same April month how could the sky give me two heart attacks?!! O__o Oh well.. the shock was well worth it, since I did capture every moment minute by minute.. almost.

I saw it by chance too as I was snapping some beautiful clouds on the 20th of April 2010, of course it was around home, and the time was past 5pm. At this time I was standing right at the edge of the paddy field and was snapping in all directions (of the sky of course) despite the curious looks and smirks of a couple of my neighbors, who luckily (or not) happens to be my relatives. They were chatting with my mom not too far from me and time to time gave me the looks.. like this.. O__o *sigh*

I simply ignored their inquisitive eyes and kept snapping the beautiful sky and then.. suddenly saw a strange glow, like a bold brush stroke, right across the sky. My instincts made me follow the sun ray all the way around the house and there I caught it.. no.. not the tail but the third magical moment.. that the blue heavens thought to bestow upon me. *well.. I already lost my 1st chance back at the Kandy town if you recall, so how can I possibly waste my 3rd chance?*

And here's the portion of the performance me and my cam witnessed...

Let the magic begin...


@ 5.40pm


@ 5.41pm


@ 5.41pm (lateral view)


@ 5.42pm (lateral view)


@ 5.42pm


@ 5.43pm


@ 5.44pm


@ 5.44pm (lateral view)


@ 5.46pm


@ 5.47pm


@ 5.48pm (lateral view)


@ 5.49pm


I did miss the 5.45 shot though, and now can't remember why I didn't snap it. -__-

Anyway thank you for enjoying this heavenly performance that comes up on stage only once in a blue moon. The End. ^__^

...

PS: I didn't tweak a single pic, just to bring you the magic as it is. ^__^

06 June 2010

In the making of Atapattam - Part 2

If you missed Part 1 click here.

...

So last time I wrapped the story when it came to the side frills right? Technique wise there's no difference in making these frills but the only difference comes in how you paste them. The frills at the bottom wraps around the frame while the side frills stick to the joints of the squares (on each 4 sides).. as you see below..


Well.. this one shows some odd colors cause this pic was taken at night, with a candle lit inside.


Want to know how I fixed the candle? Well the package (easy-to-fix lantern frame) I bought off the shop didn't have a plastic strip to hold the candle, so I had to come up with a solution.

I took one of my old plastic rulers and taped it to the bottom frame using PVC tape (adhesive ones). And then tried fixing a candle on it but.. the candle won't remain steady. Then I looked for an old oil paper bucket, cut off a strip from its cardboard bottom which had a candle holder.

Placed a candle on the holder and taped the candle to the cardboard strip. Next took this lil gizmo and placed it on the ruler (that was now fixed to the bottom of the frame). It was really tough to tape the candle holder and the cardboard strip to the ruler without breaking the fragile tissue paper decor wrapping the lantern.

It didn't come out that neat but at least the candle was really steady and didn't even budge. And the result.. is as you see below..


It was really tough adding this candle stand to the lantern so I left it out for the 2nd lantern. =D


Oh and talking about colors.. I think I made a wee mistake last time about colors. Actually I didn't realize it until I saw these photos again.. and it turned out that for the 1st atapattama I used not just one color but 3 colors to wrap it up!


Let me sum it up again.

Atapattama # 1
Covered with: white and yellow squares, orange triangles
Paper cuts: red
Frills (bottom): indigo and pink
Frills (sides): indigo and pink
Frame borders: yellow

The frame border decor is actually necessary to cover up the messy overlapping of pasted tissue paper on the edges. With paappa (the home made glue) you can never get any neat edges. What's more the lanterns they show on TV always had really cool decor to cover these borders (a frilly decor) but I didn't know how to make it either. So I used yellow strips of paper (to compensate with red, white and orange combo) and made tiny slits on both sides keeping small gaps between. And simply pasted them along the borders.. like this..


Even though the borders look neat with those centipede-like-decor, I couldn't get the paper cut neat here. You can see blots of paappa (pinkish blots) on the red paper cut right? =D  Working with paappa is never an easy task.


It took me 1.5 days to complete the 1st atapattama. And this is how it looked when hanged along with other decor.


Since I was tired to the max I thought of postponing the decoration of 2nd frame for Poson! (you know it's another special festival that comes in June) Well.. mom felt sorry for the empty frame (the 2nd frame) that was sitting around with no decor and so she insisted that I should decorate it as well.

But.. there was hardly enough time.. as it was Wesak already! Still I thought of working on it the next day. And guess what happened? While I was half way through with the 2nd frame decorations, my uncle (mom's youngest brother), his wife and eldest daughter visited us. They stared at me, then at the half done frame, again at me and back at the frame and fired the question... almost chorusing..

"Are you going to hang it up for Poson?!!! O__O *which means in June, since Wesak comes in May!*

Well.. there went my pride blown to smithereens with a flashy kaboom!.. I was so embarrassed but couldn't stop laughing at the same time. hehe.. Geez.. my folks.. don't they ever know how to appreciate someone's earnest efforts. Oh well.. but they did commend me for the neat paper cuts (those perforated ones)..  but that was like after 5- 10 minutes of teasing! lol

*ahem* So coming back to the 2nd frame.. the process was exactly the same as the 1st atapattama.. but thanks to the previous experience it didn't take me that long to finish the 2nd one. The 1st and the 2nd lanterns had a few differences though. With the colors I used, the paper cut designs, and the frame border decor.

So if I sum it up..

Atapattama #2
Covered with: white squares and triangles (made of oil paper instead of tissue paper)
Paper cuts: dark green and indigo in perforated style
Frills (bottom): pale yellow and white
Frills (sides): red and orange
Frame borders: red (the frilly style!)

*if you check the color combo here, it is totally wacky and not only two-toned but multi-toned..! But when it was completed it didn't look that weird, least to me* =D

And yep, finally I mastered *to some extent* the frilly style for the frame borders. Well that was a lucky chance, cause they showed a program on TV that covered a Wesak lantern contest. And I caught a glimpse of one of the contestants working on the very decoration of the frame borders! Yep, that cool frilly style. All he did was slide a long strip of paper along the frame border, and made frilly waves.. just like that.

My first two attempts made a mess and then I realized I was doing it wrong. Instead of applying paappa on the strip of paper I realized I should apply it on the frame border. And tada..! it was so easy to make those frilly designs just as seen on TV! =D

So.. finally I was able to hang the 2nd lantern beside the 1st one. And now my story comes to an end. *phew*

Don't worry I won't wrap it up without showing the final result. =D

So here you go.. my own Wesak decor!


See the lantern on the right with fading pink frills? The glaring sun seems to have bleached the color in a matter of 2 days!


Add a bit of strong wind and you get this!


By the way those paper chains you see are the festoon chains (made of multicolored tissue papers) I was talking about last time. They are the easiest to make. The paper buckets and paper flags and small frills were from last Wesak, so it saved me the trouble of doing more decor.

Call me stingy and lazy if you want.. =P but.. I was dead tired after decorating 2 lanterns and the chains so I was left with no energy to do anymore decor. =D

Come to think of it, I seriously can't imagine how they make those humongous lanterns (more than 10ft high) with dozens of offspring lanterns, using the toughest kinds of materials. I truly admire their commitment and patience. ^__^

Too bad I missed those lantern contests in Kandy last time but my endeavor in capturing the cream of Lankan artistry will never end.. just from that. As for proof, you'll see a couple of pics (in thumbnail) already in the 'Random Picks' column (on the right panel). You'll get to see them in their original size in my future posts. ^__^

04 June 2010

In the making of Atapattam - Part 1

Atapattama = octagonal frame = the basic shape of a Wesak lantern
...


And these are my atapattam, in negative mode!

Remember I said I bought 2 portable atapattam frames last time? The frames were plastic, durable and easy to join... is what they (the sellers) said but.. the latter.. 'easy to join' part.. wasn't quite the case. Me who do things by trial and error had a hard time putting 6 plastic squares together and binding their joints with those Lego shaped plastic fasteners. The hardest part wasn't getting the atapattam shape but trying to fix the fasteners, as they wouldn't even budge! -__-

After scraping and chipping my nails and getting my fingertips all bloodshot, an idea suddenly hit my *microscopic* brain. I searched the house high and low and found an excellent device to streamline the process of fixing the fasteners.

And guess what I found? The super efficient gizmo that can fix any stubborn fasteners super fast was none other than.. my mom's comb! It was slim enough to fit in between the atapattam joints and fix the fasteners quite easily. Within minutes everything was attached and I got the atapattam shape with no sweat. *no pain, no gain*

So.. next came another crucial part. I had to choose colors for the atapattam. Dad bought me the tissue papers a few days before, so I had no choice or say in them. I lined them up and stared at the colors - red, indigo, dark green, pale yellow, pastel pink, dark orange and white. O__o I could only come up with nothing but the weirdest, wackiest combinations and so.. that's exactly what I did!

For starters I chose white tissue paper to cover up the first atapattama. But.. I seem to have forgotten something important. Um.. I didn't quite know how to wrap it up! It's not like wrapping up a gift box you see. My common sense told me that I had to at least cut and paste the paper in pieces. But then I wondered how to measure them up now that I've joined all the parts of the atapattam!

Well you see, we usually buy the atapattam off the market, the decorated ones ready to be hanged. And it was ages ago that I ever pasted and decorated a frame, and that too with my sis' help, so I've practically forgotten the art of wrapping an atapattam. *sigh*

But I didn't give up. First I spread the white tissue on a table, then placed one atapattama on it, with the square side down. Then marked the edges, keeping an extra inch gap all around the square. Then using that as a model, folded the tissue paper into 6 equal sized squares and cut them off. Yes, I cut off 6 squares! O__O

Is that a problem? It IS a problem.. cause.. you don't exactly need 6 squares to wrap the atapattama, since the top and the bottom squares are supposed to be left open! -__- *I remembered that golden rule much later, only while I was half way through pasting the pieces!* Anyway I did the same for the triangular sides and finally set all the cut pieces aside. *phew* *one down, dozen more steps to go*

Next I was supposed to cut the frills.. but.. instead I started testing out paper cut designs. To my horror.. I was out of touch with doing paper cuts too! O__O So again trial and error came to my rescue and finally, after 10 mts worth paper cuts I made a nice carpet of confetti on the floor *yeah, made a real mess* and found a few satisfying designs like...


this... my simplest and most primitive paper cut (the red artwork in the middle).. and...


...this. The perforated design (indigo one) was the toughest but it didn't quite end up the way I wanted. -__-


Then I remembered that I forgot to cut the frills! O__O

So next I started with cutting the frills. FYI cutting frills is my forte. *ya, am bragging!* =P Every year for Wesak I don't miss making festooned frills and chains, all made of tissue papers of vivid colors, so isn't it inevitable that it becomes my forte? My sis taught me how to get the wavy effect to the frills to look like..


this. A nice sleek wavy frill.

It's really easy to make them. All I did was cut the tissue paper into half and then quarter. Take one quarter and folded the lengthy side all the way up (each fold = 0.5 inches thick) until there's a half an inch strip left. Then I sliced only the folded portion (not the left out strip) evenly, into half inch thick slices. And once done just gave it a shake and let the frills unfurl.

The left out strip holds all those individual frills together, that's why you can't cut it all the way up. And the result... is just as you see in the above pic. *phew* * two down, (dozen-1) more steps to go*

So ya, like in the pic I took indigo and pastel pink tissue papers to cut the frills. *this pink was a light color even though my cam shows it as dark* Now.. it was time to paste. So I made a glue called 'paappa' out of (all purpose) flour and water. Too much water and it becomes a batter, too lil water and it becomes a dough. So this glue called paappa had to be somewhere in between.

You'll know it when you see the mixture becoming a creamy, gooey, sticky paste. Off I went on pasting the cut pieces right and left. While pasting I cut off the superfluous paper to make it look neat at the edges. I pasted all the white tissue pieces on all sides. *of course I left out the top and bottom squares* =P

Then hanged the atapattama using twine and started pasting the frills right around its bottom square. Once done I stared at my hands. They were completely covered in a thick coating of multicolored paappa.. which had already become as hard as cement. -__- *three down, (dozen - 2) more steps to go*

And then.. I just remembered that I didn't cut frills for the sides of the atapattama! O__O

...

To be contd. *sigh*

Stay tuned for the next episode! ^__^
Related Posts Plugin for WordPress, Blogger...